Building Your First Raspberry Pi Project: Smart Home Controller
This comprehensive guide will walk you through every step of developing your own intelligent home automation system, from initial setup to advanced customization options.
The world of DIY electronics has never been more accessible, and building your first Raspberry Pi project opens up endless possibilities for home automation enthusiasts. Whether you’re a complete beginner or someone with basic programming knowledge, creating a smart home controller represents the perfect introduction to the versatile world of Raspberry Pi computing. This comprehensive guide will walk you through every step of developing your own intelligent home automation system, from initial setup to advanced customization options.
What Makes Raspberry Pi Perfect for Smart Home Projects
The Raspberry Pi stands out as an ideal platform for home automation due to its compact size, affordable price point, and remarkable versatility. This credit card-sized computer packs impressive processing power while maintaining energy efficiency, making it perfect for continuous operation in smart home applications. When building your first Raspberry Pi project, you’ll discover that this miniature computer can handle multiple tasks simultaneously, from controlling lights and monitoring sensors to managing security systems and streaming media.
The GPIO (General Purpose Input/Output) pins provide direct hardware interaction capabilities, allowing you to connect various sensors, relays, and control devices without requiring expensive intermediary hardware. Additionally, the extensive community support and abundant online resources make troubleshooting and expanding your project significantly easier than with other microcontroller platforms.
Essential Components and Hardware Requirements
Before diving into your smart home controller project, gathering the right components ensures a smooth development process. Your shopping list should include a Raspberry Pi 4 (recommended for optimal performance), a high-quality microSD card with at least 32GB capacity, a reliable power supply rated for your Pi model, and a protective case to prevent damage during operation.
For the smart home functionality, you’ll need additional components such as relay modules for controlling high-voltage devices, temperature and humidity sensors (DHT22 is popular), motion detection sensors, breadboards for prototyping, jumper wires, and resistors. Consider investing in a GPIO expansion board to organize connections more efficiently, especially when building your first Raspberry Pi project with multiple sensors and outputs.
Don’t forget networking components if you plan to control devices remotely. While the Raspberry Pi 4 includes built-in WiFi, having an Ethernet cable as backup ensures reliable connectivity during initial setup and troubleshooting phases.
Setting Up Your Raspberry Pi Development Environment
The foundation of any successful Raspberry Pi project begins with proper system installation and configuration. Start by downloading the official Raspberry Pi OS from the Raspberry Pi Foundation website, then use the Raspberry Pi Imager tool to flash the operating system onto your microSD card. This process has become remarkably streamlined, with the imager automatically handling partitioning and initial configuration steps.


During the imaging process, enable SSH access and configure your WiFi credentials to facilitate headless operation. Once your Pi boots up, update the system packages using the terminal commands sudo apt update and sudo apt upgrade to ensure you’re working with the latest software versions.
Install essential development tools including Python 3 (usually pre-installed), pip package manager, and GPIO libraries such as RPi.GPIO or the more modern gpiozero library. These tools form the backbone of your smart home controller, providing the necessary interfaces for hardware communication and system control.
Programming Your Smart Home Controller
The heart of your smart home controller lies in the Python code that orchestrates all connected devices and sensors. When building your first Raspberry Pi project, Python offers an excellent balance of simplicity and power, making it ideal for beginners while providing advanced capabilities for complex automation scenarios.
Start by creating a basic structure that defines your smart home zones and connected devices. Implement classes for different device types such as lights, sensors, and switches, each with appropriate methods for status checking and control operations. This object-oriented approach makes your code more maintainable and expandable as your smart home system grows.
import RPi.GPIO as GPIO
import time
from datetime import datetime

class SmartHomeController:
    def __init__(self):
        GPIO.setmode(GPIO.BCM)
        self.devices = {}
        self.sensors = {}

    def add_device(self, name, pin, device_type):
        GPIO.setup(pin, GPIO.OUT)
        self.devices[name] = {'pin': pin, 'type': device_type, 'status': False}

    def control_device(self, name, status):
        if name in self.devices:
            GPIO.output(self.devices[name]['pin'], status)
            self.devices[name]['status'] = status
Implement scheduling functionality to automate routine tasks such as turning lights on at sunset or adjusting temperature settings based on occupancy patterns. The Python schedule library provides an intuitive interface for time-based automation, while more complex scenarios might benefit from cron job integration.
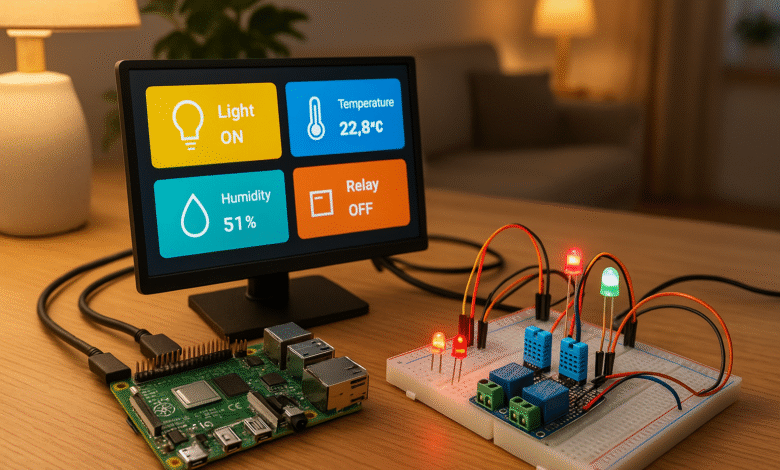
Sensor Integration and Environmental Monitoring
Environmental monitoring capabilities transform your basic controller into an intelligent system that responds to real-world conditions. Temperature and humidity sensors provide essential data for climate control automation, while light sensors can trigger automatic lighting adjustments based on natural illumination levels.
When integrating sensors into your Raspberry Pi project, proper calibration ensures accurate readings that form the foundation of reliable automation decisions. The DHT22 sensor, popular among hobbyists, provides both temperature and humidity measurements with reasonable accuracy for most home automation applications.
Motion detection sensors add security and convenience features to your smart home controller. PIR (Passive Infrared) sensors detect movement within their coverage area, triggering appropriate responses such as turning on lights in occupied rooms or sending security alerts when unexpected motion occurs during away periods.
Implement data logging functionality to track environmental conditions over time. This historical data proves invaluable for optimizing automation rules and identifying patterns in your home’s environmental behavior. Store sensor readings in CSV files or consider using lightweight databases like SQLite for more sophisticated data management needs.
Creating a User Interface for Remote Control
A well-designed user interface transforms your Raspberry Pi smart home controller from a technical project into a user-friendly home automation system. Web-based interfaces offer the greatest flexibility, allowing control from any device with a web browser, including smartphones, tablets, and computers.
Flask, a lightweight Python web framework, provides an excellent foundation for building your control interface. Create responsive web pages that display device statuses, allow manual control overrides, and present sensor data in easily digestible formats. When building your first Raspberry Pi project with web capabilities, start with simple HTML forms and gradually incorporate JavaScript for more dynamic user experiences.
Mobile responsiveness becomes crucial for smart home interfaces, as users frequently control their systems using smartphones. Implement CSS media queries and flexible layouts that adapt seamlessly to different screen sizes and orientations.
Consider adding real-time updates using WebSocket connections or AJAX polling to keep the interface synchronized with actual device states. This prevents confusion when multiple users access the system simultaneously or when automated rules change device statuses.
Implementing Security and Safety Features
Security considerations become paramount when your Raspberry Pi project controls physical devices and connects to your home network. Implement authentication mechanisms to prevent unauthorized access to your smart home controller, starting with strong password requirements and considering multi-factor authentication for enhanced protection.
Network security measures should include changing default credentials, disabling unnecessary services, and implementing firewall rules that restrict access to essential ports only. Regular security updates ensure your system remains protected against newly discovered vulnerabilities.
Safety features protect both your home and the Raspberry Pi itself from electrical or operational hazards. Implement current monitoring to detect overloaded circuits, temperature monitoring to prevent overheating of connected devices, and automatic shutdown procedures that activate during error conditions or power anomalies.
Create backup and recovery procedures that allow quick system restoration after hardware failures or configuration errors. Regular automated backups of your configuration files and custom code prevent data loss and minimize downtime during system maintenance or unexpected failures.
Advanced Features and Expansion Options
Once your basic smart home controller operates reliably, numerous expansion opportunities can enhance functionality and user experience. Voice control integration using services like Amazon Alexa or Google Assistant adds convenient hands-free operation capabilities to your Raspberry Pi project.
Machine learning algorithms can analyze usage patterns and automatically optimize automation rules for improved energy efficiency and user comfort. Simple algorithms like moving averages help smooth sensor readings and reduce false triggers, while more sophisticated approaches might predict occupancy patterns or seasonal adjustment needs.
Integration with external services through APIs extends your controller’s capabilities beyond direct hardware control. Weather service APIs provide forecast data for predictive automation, while cloud storage services enable remote data backup and multi-location system synchronization.
Home security enhancement features such as camera integration, door/window monitoring, and intrusion detection transform your controller into a comprehensive security system. The Raspberry Pi Camera Module provides high-quality video capabilities for monitoring and recording, while USB webcams offer cost-effective alternatives for multiple camera installations.
Troubleshooting Common Issues and Optimization
Every Raspberry Pi project encounters challenges during development and operation, making troubleshooting skills essential for long-term success. Common issues include GPIO pin conflicts, power supply inadequacy, and network connectivity problems that can disrupt system operation.
Power supply problems often manifest as random reboots, SD card corruption, or erratic GPIO behavior. Ensure your power supply meets the Raspberry Pi’s current requirements with adequate margin for connected devices. Quality power supplies with proper voltage regulation prevent many operational issues.
GPIO pin management becomes critical as your project expands. Document pin assignments carefully and implement proper cleanup procedures in your code to prevent resource conflicts. The try/except/finally structure ensures GPIO pins reset properly even when errors occur during program execution.
Performance optimization involves monitoring system resources and identifying bottlenecks that might affect responsiveness. CPU usage, memory consumption, and disk I/O metrics help identify performance issues before they impact user experience.
Maintenance and Long-term Reliability
Sustainable operation of your smart home controller requires regular maintenance procedures and proactive monitoring of system health. Establish routines for software updates, log file management, and hardware inspection that prevent minor issues from becoming major failures.
Automated monitoring scripts can track system vital signs and alert you to potential problems before they cause service interruptions. Monitor disk space usage, CPU temperature, network connectivity, and device response times to maintain optimal performance levels.
Documentation of your system configuration, custom code modifications, and troubleshooting procedures proves invaluable during maintenance activities or system upgrades. Well-maintained documentation enables quick problem resolution and facilitates knowledge transfer if others need to service your system.
Plan for hardware lifecycle management by identifying critical components that might require replacement over time. SD cards, in particular, have limited write cycles that can lead to corruption after extended use. Regular backups and spare component availability ensure minimal downtime during hardware replacement procedures.
Conclusion
Building your first Raspberry Pi project as a smart home controller provides an excellent introduction to home automation while developing valuable technical skills in hardware interfacing, programming, and system integration. The combination of affordable hardware, extensive software libraries, and strong community support makes the Raspberry Pi platform ideal for both learning and practical home automation applications.
This project serves as a stepping stone toward more advanced automation systems while delivering immediate practical benefits through intelligent control of lighting, climate, and security systems. The expandable nature of Raspberry Pi projects means your initial smart home controller can evolve into a sophisticated automation platform that adapts to changing needs and technologies.
The skills developed during this project extend far beyond home automation, providing a foundation for understanding embedded systems, network programming, and hardware integration principles that apply across numerous technology domains. Whether you continue expanding your smart home capabilities or explore other Raspberry Pi applications, the experience gained from building your first project opens doors to countless future possibilities in the exciting world of maker technology and DIY electronics.