Whether you recently got married, decided to use a different version of your name, or simply want to correct a typo, knowing how to change your name on Facebook is something every user should understand. While the process might seem straightforward, Facebook has specific rules and restrictions that govern name changes on the platform. You can only change your Facebook name once every 60 days, and your name must comply with Facebook’s real-name policy.
This means you can’t use fake names, titles, symbols, or random characters that don’t represent your actual identity. The platform requires these guidelines to maintain authenticity and prevent fraudulent accounts.
In this comprehensive guide, we’ll walk you through everything you need to know about changing your name on Facebook, including the exact steps for mobile and desktop, what Facebook’s naming policy allows, common issues you might encounter, and how to add nicknames or alternative names to your profile.
Whether you’re using an iPhone, Android device, or computer, this guide will help you successfully update your Facebook profile name without running into problems or delays.
Understanding Facebook’s Name Policy Before You Make Changes
Before you attempt to change your name on Facebook, you need to understand the platform’s strict naming requirements. Facebook enforces what’s called a “real-name policy” that requires users to provide their authentic identity as it appears in everyday life.
What Facebook Allows
Facebook’s naming policy permits several types of names on your profile:
- Your legal name as it appears on government-issued identification documents
- Nicknames as your first or middle name, as long as they’re variations of your actual name (like “Dave” for “David”)
- Maiden names or other family names you’ve used throughout your life
- Professional names if they’re authentic representations of how people know you
The key principle is authenticity. Facebook wants to ensure that the name on your profile represents who you actually are in real life.


What Facebook Prohibits
When you try to change your Facebook name, the platform will reject your request if your chosen name includes:
- Symbols, numbers, or unusual capitalization (like “@John” or “JoHn123”)
- Characters from multiple languages mixed together
- Titles of any kind, whether professional or honorary (Dr., Prof., Sir, etc.)
- Offensive or suggestive words
- Random phrases or words that aren’t names
- Names that impersonate celebrities or public figures
- Single-word names in most cases (though some cultures use single names)
Facebook reviews each name change request to ensure it complies with these standards. If your name violates these rules, you’ll receive a notification explaining why your request was denied.
The 60-Day Restriction
One of the most important rules to understand is Facebook’s 60-day limit on name changes. Once you successfully change your name on Facebook, you cannot change it again for another 60 days. This restriction exists to prevent abuse and maintain the authenticity of profiles on the platform.
This means you need to be absolutely certain about your new name before you submit the change. If you make a spelling mistake or change your mind, you’ll be stuck with that name for two full months. There’s no way around this restriction unless you contact Facebook support with a legitimate reason, which we’ll discuss later in this guide.
How to Change Your Name on Facebook on iPhone and Android
The process to update your Facebook name on mobile devices is simple once you know where to look. Facebook has consolidated many account settings into something called the Account Center, which manages your information across Facebook, Instagram, and other Meta platforms.
Step-by-Step Instructions for Mobile
Follow these detailed steps to change your Facebook profile name on your smartphone:
- Open the Facebook app on your iPhone or Android device
- Tap the menu icon (three horizontal lines) located at the bottom-right corner on iOS or the top-right corner on Android
- Scroll down and tap “Settings & Privacy” to expand the menu
- Select “Settings” from the expanded options
- Tap “See more in Account Center” under the Account Settings section
- Choose “Profiles” to see all your connected profiles
- Select your Facebook profile from the list
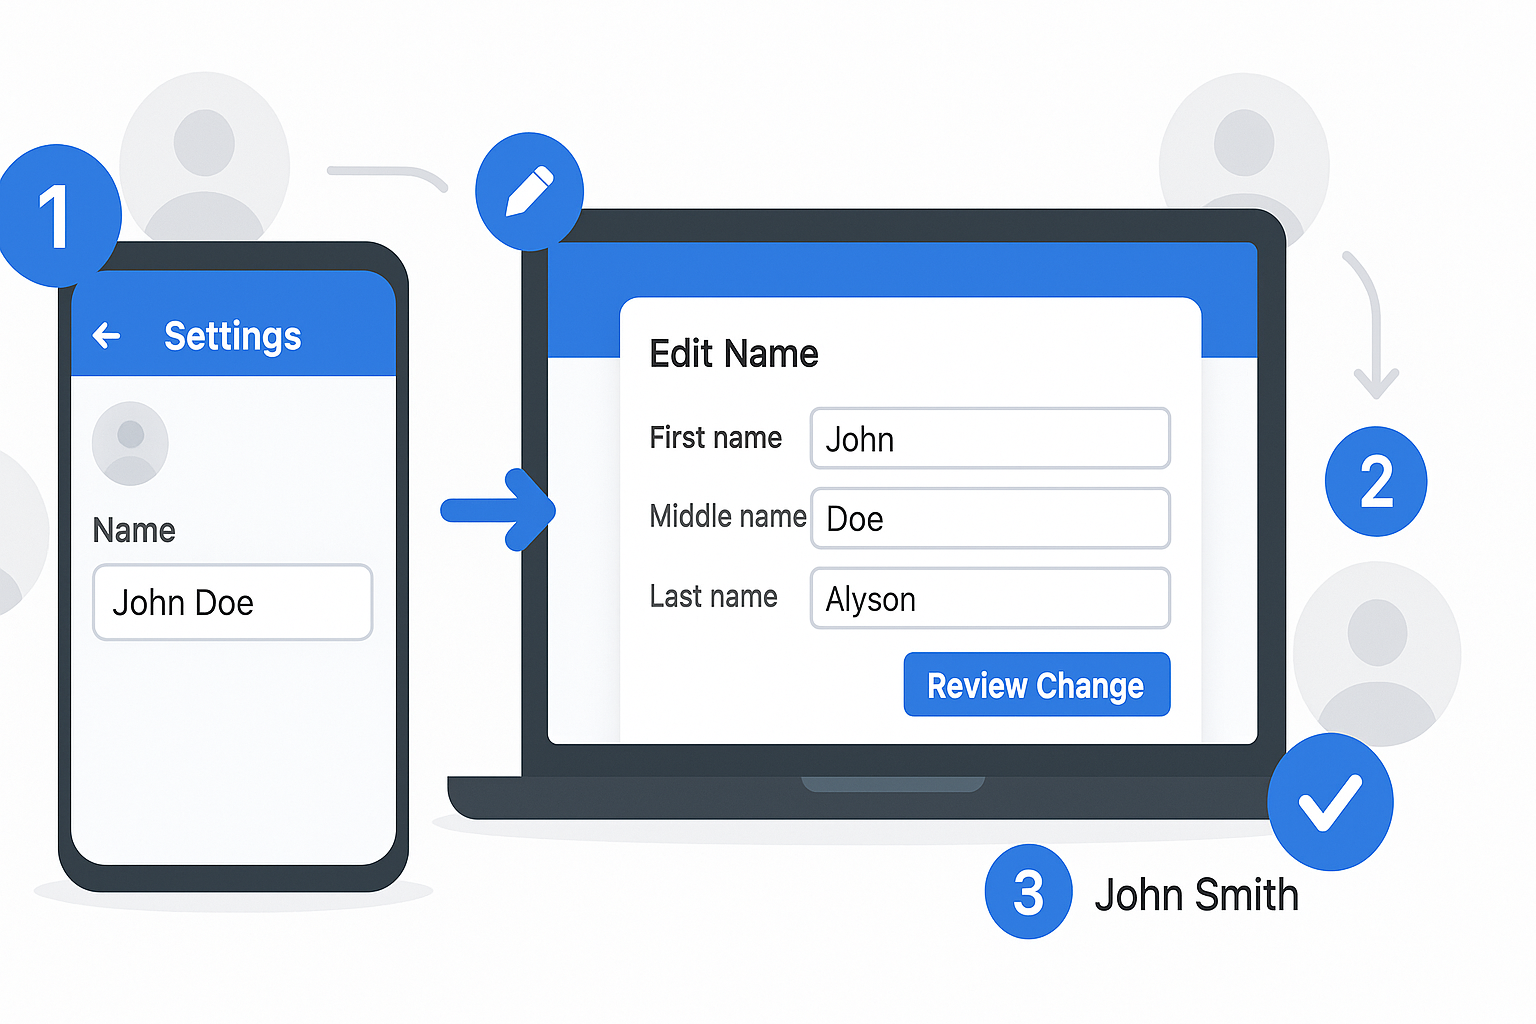
- Tap “Name” to access the name editing interface
- Enter your new first name, middle name, or last name in the appropriate fields
- Review your changes carefully by tapping “Review Change”
- Enter your Facebook password when prompted to verify your identity
- Tap “Save Changes” to submit your request
After you complete these steps, Facebook will review your name change request. Most changes are approved instantly if they comply with Facebook’s naming policy, but some requests may take up to 24 hours to process.
Alternative Method Through Settings
You can also change your Facebook name through a slightly different path:
- Open Facebook and tap the menu icon
- Tap “Settings & Privacy” then “Settings”
- Under “Account,” tap “Personal and account information”
- Tap “Name”
- Make your changes and follow the prompts
Both methods lead to the same result, so use whichever path feels more intuitive to you.
How to Change Your Name on Facebook on Desktop
If you prefer using Facebook on your computer, the desktop process to change your name on Facebook is equally straightforward. Many users find the desktop interface easier because you can see all your options on a larger screen.
Complete Desktop Instructions
Here’s how to update your Facebook profile name using a web browser:
- Go to facebook.com and log into your account
- Click your profile picture in the top-right corner of the screen
- Select “Settings & Privacy” from the dropdown menu
- Click “Settings” to access your account settings
- Find “Account Center” on the left sidebar and click it
- Click “Profiles” in the Account Center menu
- Select your Facebook profile from the available profiles
- Click “Name” to edit your name fields
- Type your new first name, middle name, or last name as desired
- Click “Review Change” to preview how your name will appear
- Enter your password to confirm your identity
- Click “Save Changes” to finalize the update
Facebook will show you how your name will display on your profile before you finalize the change. This preview feature helps you catch any mistakes before committing to the new name for the next 60 days.
Using the Classic Settings Path
Some users may still see the older settings layout. If that’s your case:
- Click the down arrow in the top-right corner
- Select “Settings & Privacy” then “Settings”
- Click “Name” under the General section
- Edit your name and enter your password
- Click “Review Change” then “Save Changes”
Adding a Nickname or Alternative Name to Your Facebook Profile
Sometimes you don’t want to completely change your Facebook name, but rather add a nickname or alternative name that people know you by. Facebook allows this through the “Other Names” feature, which is different from your primary profile name.
Why Add a Nickname
Adding a nickname to your Facebook profile can be useful for several reasons:
- Friends and family know you by a shortened version of your legal name
- You go by a different name professionally but want both names visible
- You’ve changed your name but want people to find you under your old name
- You have a culturally significant name you’d like to display alongside your legal name
The beauty of nicknames on Facebook is they don’t replace your official profile name—they simply appear alongside it, making it easier for people to recognize and find you.
How to Add a Nickname
To add a nickname on Facebook:
- Follow the steps above to access your name settings
- Look for the “Other Names” section below your primary name fields
- Click or tap “Add other name”
- Choose the type of name from the dropdown (Nickname, Birth Name, Maiden Name, Alternate Spelling, or Other)
- Enter the alternative name in the text field
- Check the box that says “Show at top of profile” if you want it prominently displayed
- Enter your password and save the changes
Your nickname will now appear on your profile, and people can search for you using either your primary name or your nickname. This flexibility makes it easier to maintain your authentic identity while still being findable under different names you’ve used throughout your life.
Also Read: How to Block People on Snapchat Without Them Knowing
Common Reasons Why You Can’t Change Your Facebook Name
Many users run into problems when trying to change their name on Facebook. Understanding these common issues can save you frustration and help you resolve problems quickly.
You Changed Your Name Recently
The most common reason people can’t update their Facebook name is that they’ve already made a change within the last 60 days. Facebook’s system automatically blocks name change requests if you’ve modified your name in the past two months. Unfortunately, there’s no workaround for this restriction under normal circumstances.
If you absolutely need to change your name again before the 60-day limit expires, your only option is to contact Facebook support and explain your situation. They may make an exception for legitimate reasons like:
- You made a typo in your previous name change
- You legally changed your name due to marriage, divorce, or other life events
- Your account was hacked and someone changed your name without permission
Your Name Doesn’t Meet Facebook’s Guidelines
Facebook’s automated system reviews all name change requests for policy compliance. If your requested name violates any of Facebook’s naming rules, the change will be rejected. Common violations include:
- Using numbers or symbols
- Adding professional titles
- Using all capital letters
- Including words that aren’t actually part of your name
- Attempting to use a single-word name without cultural justification
To resolve this issue, review your chosen name against Facebook’s official name standards and make sure it complies with all requirements.
Facebook Requires Identity Verification
Sometimes Facebook’s security systems flag certain name changes as potentially fraudulent. When this happens, the platform may ask you to verify your identity by uploading a copy of your government-issued ID, such as:
- Driver’s license
- Passport
- National identity card
- Birth certificate
- Official name change documentation
This identity verification process helps Facebook prevent impersonation and maintain the authenticity of profiles on the platform. According to Meta’s Community Standards, authentic identity is crucial for building a safe environment.
If Facebook asks for verification, submit clear, legible photos of your documentation showing your name. The review process typically takes 24 to 48 hours, though it can occasionally take longer during peak times.
Technical Glitches or Account Restrictions
In some cases, technical issues or account restrictions can prevent you from changing your name:
- Account restrictions: If Facebook has restricted your account for violating community standards, you may be temporarily unable to make changes
- Browser issues: Try clearing your cache and cookies, or use a different browser
- App problems: Update your Facebook app to the latest version or try using the desktop site instead
- Server issues: Sometimes Facebook’s systems are temporarily down for maintenance
Tips for Successfully Changing Your Facebook Name
To ensure your Facebook name change goes smoothly and gets approved on the first try, follow these practical tips:
Double-Check Your Spelling
Before you click “Save Changes,” carefully review every letter of your new name. Remember that you can only change your name on Facebook once every 60 days, so a simple typo could leave you stuck with a misspelled name for two months. Take a few extra seconds to verify that:
- Your first name is spelled correctly
- Your middle name (if included) has no errors
- Your last name is accurate
- Capitalization follows standard naming conventions
- You haven’t accidentally included extra spaces
Use Your Real Name
Facebook’s real-name policy exists for good reason. Don’t try to use clever variations, fake names, or creative spellings that don’t match your actual identity. If you wouldn’t use that name on a job application or legal document, don’t use it on Facebook. Stick to how your name appears on official documents like:
- Government-issued IDs
- Bank accounts
- Employment records
- Educational certificates
Consider How Your Name Will Display
Before finalizing your name change, think about how it will appear across Facebook. Your name shows up on:
- Your profile page
- All your posts and comments
- Friend suggestions for others
- Search results
- Messages and notifications
Choose a name that clearly represents your identity and makes it easy for friends, family, and colleagues to recognize you. If you have a common name, consider including your middle name or initial to distinguish yourself from others.
Save Your Previous Name as a Nickname
If you’re changing your name due to marriage, divorce, or personal preference, consider adding your previous name as a nickname or “other name” on your profile. This helps people who know you by your old name find and recognize you after the change. It’s especially helpful during transition periods when some people know you by one name and others by another.
What Happens After You Change Your Facebook Name
Once you successfully update your name on Facebook, several things happen across the platform:
Immediate Changes
Your new name will appear on:
- Your profile page header
- All future posts and comments you make
- Your name in friend lists and search results
- Messages you send (though old message threads may still show your previous name)
- Tags in photos and posts
What Doesn’t Change
It’s important to understand that changing your Facebook profile name doesn’t modify:
- Your Facebook username/URL (the custom link to your profile)
- Previous posts and comments (these will gradually update with your new name)
- Messenger conversations (old messages keep your previous name)
- Pending friend requests sent before the change
Privacy Considerations
Facebook doesn’t send notifications to your friends when you change your name. However, people may notice the change when they:
- See your posts in their News Feed
- Visit your profile page
- Receive messages from you
- Look at their friend list
If you’re changing your name for privacy or safety reasons, be aware that your profile remains searchable, and your previous posts across Facebook may still be visible to anyone who could see them before.
Troubleshooting Facebook Name Change Issues
If you’re having trouble changing your Facebook name, try these troubleshooting solutions:
Clear Your Browser Cache and Cookies
Sometimes cached data can interfere with making changes to your account:
- Open your browser settings
- Find the privacy or history section
- Clear browsing data, including cache and cookies
- Restart your browser and try again
Try a Different Device or Platform
If the mobile app isn’t working, try the desktop website, or vice versa. Sometimes platform-specific bugs can prevent changes, and switching devices can resolve the issue.
Contact Facebook Support
If you’ve tried everything and still can’t change your name on Facebook, reach out to Facebook’s support team:
- Go to the Facebook Help Center
- Search for “name change issues”
- Follow the prompts to submit a support request
- Provide detailed information about your problem
- Include screenshots if relevant
- Wait for a response (usually within 24-48 hours)
Verify Your Account Isn’t Restricted
Check if your account has any active restrictions that might prevent name changes:
- Go to Settings & Privacy
- Select Settings
- Look for any warnings or restrictions notices
- If restricted, follow Facebook’s instructions to resolve the issue
Frequently Asked Questions About Changing Your Facebook Name
Can I Change My Facebook Name More Than Once?
Yes, but only after waiting 60 days between each change. Facebook strictly enforces this 60-day limit to prevent abuse and maintain authenticity on the platform.
Will Changing My Name Affect My Facebook Page?
No. Your personal Facebook profile name is separate from any Facebook Pages you manage. Changing your profile name won’t affect your Pages, and changing a Page name follows different rules and procedures.
Can I Use a Single Name on Facebook?
Facebook typically requires both a first and last name. However, users from cultures where single names are traditional can request an exception by contacting Facebook support and providing documentation.
What If Someone Else Has My Name?
Multiple people can have the same name on Facebook since the platform assigns unique identifiers to every account. Your name doesn’t have to be unique across the entire platform.
Can I Change My Name Back Immediately?
No. Even if you want to revert to your previous name, you must wait the full 60 days after any name change before making another modification.
Conclusion
Successfully changing your name on Facebook requires understanding the platform’s naming policy, following the correct steps for your device, and avoiding common mistakes that lead to rejected requests. Whether you’re using the mobile app or desktop website, the process to change your name on Facebook takes just a few minutes when done correctly.
Remember that Facebook’s 60-day restriction means you should carefully verify your spelling and ensure your chosen name complies with all guidelines before submitting the change. If you run into problems, the troubleshooting tips in this guide should help you resolve most issues quickly.
By following this comprehensive step-by-step guide, you can confidently update your Facebook profile name to reflect your current identity, whether that’s due to marriage, personal preference, or simply correcting an old mistake. Take your time, double-check your information, and you’ll have your new name displaying across Facebook without any complications.